Extensible Worker Pattern 2/3
Note
This is Part 2 of a three-part series.
- Part 1 - pattern motivation and theory
- Part 2 - naïve implementation
- Part 3 - pattern implementation
Introduction
Let’s quickly review Part 1 of the series.
In Part 1, we:
- Made the case for extensibility as a quality attribute to seek in designing algorithm-centric production workflows.
- Presented a fictional use case for a containerized analysis worker environment, a common kind of setup in real-world applications, that reads images from a queue and runs algorithms on them.
- Came up with an initial design the worker, naïve with respect to extensibility.
- Analyzed what made the initial design less extensible and used our conclusions to come up with a design pattern that solves for extensibility.
In Part 2, we’ll go through implementing the naïve design. This is useful mostly as a precursor to Part 3 where we’ll re-implement our worker using the final design pattern. By first having the initial design coded and functioning, we’ll be able to apply the pattern to it, test that it still works and look at how much easier it is to extend in practical terms.
A note on implementation and code structure
As explained in Part 1, we’ll implement everything in Python. I include some code snippets throughout the article tailored to aid discussion, but you can find the complete working code for the example this GitHub repo. Code for the initial design presented here is available in branch initial.
The code for all components is placed in a single repository. Looking at the repo, you’ll find a directory for each component with its source files, Dockerfile and a build.sh script. The worker and producer directories are there to assist in running and testing everything locally.
Implementation
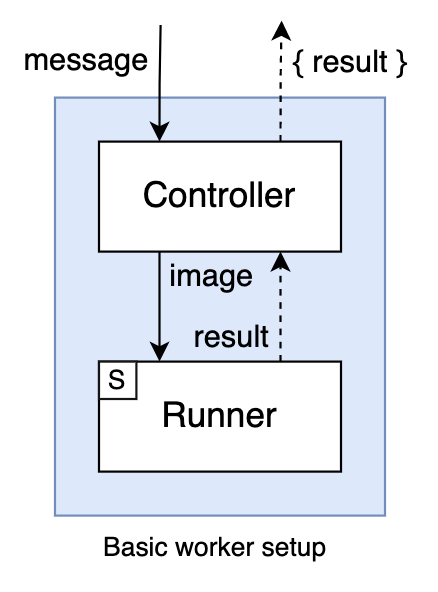
To quickly review Part 1, the initial design we’ll implement here consists of a Controller component that reads images from a queue and sends them to a Runner component. The latter houses the actual algorithm code, and exposes it on an auxiliary HTTP server for the controller to send requests to.
Controller
We’ll be using a RabbitMQ queue called tasks in our example setup, so we set up our controller with pika to consume from the tasks queue.
import pika

connection = pika.BlockingConnection(pika.ConnectionParameters(host='localhost'))
channel = connection.channel()
channel.queue_declare(queue='tasks')
We define a callback to be run on each consumed message. This callback does the controller work: call the runner, check for errors in the response and do something with the result or the error. In our example, we just log the result if the image was processed successfully and the error otherwise.
import requests

RUNNER_HOST = os.environ.get('RUNNER_HOST', 'localhost')
RUNNER_PORT = os.environ.get('RUNNER_PORT', 5000)

def callback(c, m, p, body):
		print('Received message, calling runner')
    headers = {'Content-Type': 'application/json'}
    url = 'http://{}:{}'.format(RUNNER_HOST, RUNNER_PORT)
    response = requests.request("POST", url, headers=headers, data=body)
    if response.ok:
        print(f'Received result from runner: {response.json()}')
    else:
        print(f'Received error response from runner: {response.status_code} {response.json()}')
        # Handle error (retry/requeue/send to dead-letter exchange)
Lastly, we start listening for messages on the queue.
channel.basic_consume(queue=QUEUE_NAME, on_message_callback=callback, auto_ack=True)
print(f'Listening for messages on queue {QUEUE_NAME}')
channel.start_consuming()
Classifier
I trained a simple classifier for the purposes of this article. Since our focus here is on the ML Ops side of things, we’ll just use the model as a black box and look at how to use and deploy it. However, you can check out the supported memes, model, data and full code for training in this kaggle notebook. Credit to Keras’s transfer learning guide and to gmor’s meme dataset on Kaggle.
We define a classifier module responsible for loading and running the classifier. In this module, the model is loaded and compiled from its .h5 serialization upon initialization. In this case, we assume the .h5 file is packaged with the code in a model/ directory at root level.
import tensorflow as tf

with open('model/meme-classifier-model.json') as f:
    model = tf.keras.models.model_from_json(f.read())

model.load_weights('model/meme-classifier-model.h5')
model.compile(
    optimizer=tf.keras.optimizers.Adam(),
    loss='categorical_crossentropy',
    metrics=['accuracy'],
)
For running the model, we expose a run_on_url function. It uses some auxiliary functions to process the input image and the output. We’ll omit the code for these functions to reduce cluttering here, but you can find it in the repo.
def run_on_url(url):
    logger.debug('Fetching image')
    image_bytes = _get_image_bytes(url)

    logger.debug('Reading and preparing image')
    image_tensor = _get_image_tensor(image_bytes)

    logger.debug('Running on image')
    pred = model.predict(image_tensor)

    return _pred_to_label(pred)
We also define a server module responsible for exposing the classifier on a local HTTP endpoint. We use the FastAPI and uvicorn to set up a simple API on a local HTTP server that calls classifier.run_on_url upon POST requests on / with a JSON body containing an image URL. It looks something like this.
Some relevant imports. exceptions is a local module defining expected exceptions in our application (find it in the repo).
from fastapi import FastAPI, HTTPException
from pydantic import BaseModel

import classifier
import exceptions
Define request and response models using Pydantic.
class ClassificationRequest(BaseModel):
    image_url: str

class ClassificationResponse(BaseModel):
    label: str
    score: float
Define the FastAPI app and the API.
app = FastAPI()

@app.post("/", status_code=200)
async def run_algorithm(request: ClassificationRequest):
    try:
        logger.info('Running classifier on URL'.format(request.image_url))
        label, score = classifier.run_on_url(request.image_url)
        return ClassificationResponse(label=label, score=score)

    except exceptions.RequestError as e:
        raise HTTPException(status_code=400, detail=f'Error fetching request image, received {e.response.status_code}')

    except Exception as e:
        error_str = traceback.format_exc()
        raise HTTPException(status_code=500, detail=error_str)
Run the server when main.
if __name__ == '__main__':
    uvicorn.run(app)
Notice we leverage FastAPI automatic model validation on our endpoint and we do some additional error management for errors we can expect coming from our processing of that payload. As we saw above, the controller looks out for an error status being returned by its runner and does some management itself of the failure to process a given message (like logging it and/or sending it to a dead-letter exchange). So in implementing the runner, we want to be diligent in capturing expected errors so that we can return a meaningful status for the controller to handle, which will later help us understand failed messages more easily and be robust in managing unexpected errors.
Dockerization, Compose File
I tend to favor containerizing all components that go into a worker setup as this lends itself very well to deployment using orchestration tools such as AWS ECS or Kubernetes. It also helps in minimizing differences between development, staging and production environments. We’ll use Docker Compose to run our setup locally.
Controller Dockerfile
FROM python:3.7

WORKDIR /opt/project

COPY requirements.txt .

RUN pip install -r requirements.txt

COPY ./* ./
Classifier Dockerfile
FROM tensorflow/tensorflow

WORKDIR /opt/project

COPY ./requirements.txt requirements.txt
RUN pip install --no-cache-dir --upgrade -r requirements.txt
RUN pip install pillow

COPY ./ ./
Compose file
We set our environment up with the queue service and both components of our worker. I only show some relevant fields from the file, but you can check it out with all of its details in the repo.
The restart and depends_on clauses in the controller service are there to allow a warmup period for the rabbitmq service after it starts.
version: '3'
services:
  rabbitmq:
    image: rabbitmq:3
    ports:
      - 5672:5672

  meme-classifier:
    image: meme-classifier
    command: python server.py

  controller:
    image: controller
    command: python main.py
    restart: on-failure
    depends_on:
      - rabbitmq
Producer
The code in the producer directory is there to aid in testing. It’s set up to connect to the queue and allow us to easily send some test messages for our worker to process.
Testing it out
After building the component images and tagging them appropriately, run docker-compose up -d in the worker directory to spin up the environment. Run docker-compse logs -f to track initialization. You’re likely to see some connection errors from controller as it fails to connect to queue while the latter completes its initialization.
Once both the controller and classifier services are listening for messages and requests respectively, we can send some meme image URLs to the queue and get some classification happening.
...
meme-classifier | INFO :: [+] Listening on port 5000
...
controller      | INFO :: [+] Listening for messages on queue tasks
Let’s try one out.

From a terminal at ./producer/:
$ python main.py "https://memegenerator.net/img/instances/39673831.jpg"
Logs:
controller         | INFO :: Received message, calling runner
meme-classifier    | INFO :: Running classifier on URL
controller         | INFO :: Received result from runner: {'label': 'matrix_morpheus', 'score': 0.99989}
Looking good! You can play around some more with it if you like and have some fun looking at memes as I have while doing the same 😛.
What’s Next
In Part 3 of the series, we’ll implement the final pattern presented in Part 1 and test it. We’ll then try to further extend our resulting setup with a new algorithm and see in practical terms if we achieved our goal of making it low-overhead and easy to do.